November 10, 2026 · 14 min read · Pineflows team
Automated Options Trading: How It Works and Its Risks
Automated options trading explained: alert, webhook and bot setups, failure modes, risk controls and how to evaluate platforms before going live.
Your strategy just fired while you were away from your desk. By the time you saw the phone notification, opened your broker app, found the right expiry and strike, and checked the spread, the contract price had moved and the setup you backtested no longer matched the trade in front of you.
That's the moment most traders start looking at automated options trading. The appeal is obvious. A rule sends the order for you. But removing the click doesn't remove the work. It moves the work to proving that every order was authorized, timely, filled as expected, and recoverable when something goes wrong.
A signal can be right and the trade can still go badly. An alert can arrive late, a contract symbol can be incomplete, a spread can be too wide, or only one leg can fill. This guide treats automation as an execution reliability problem, so you can build checks before money is at risk.
Table of Contents
- Alerts, Webhooks and Bots Compared
- How a Webhook Turns a Signal into an Order
- Multi-leg Orders and Leg Risk
- Failure Modes That Backtests Never Show
- Risk Controls to Build In Before Going Live
- Backtesting Options Strategies Without Fooling Yourself
- Evaluating Platforms Against Five Criteria
- Confirm Scope and Test Before Going Live
Alerts, Webhooks and Bots Compared
Automated options trading means a set of rules decides when an options order is sent, so you don't click each time a condition is met. Your job shifts from placing orders to defining the rule, setting limits, and reviewing what the system did.
It resembles cruise control. The system maintains the speed you set, but you still steer, watch the road, and can take over at any moment. If the speed was wrong for conditions, automation will hold it faithfully anyway.
Scale is part of why reliability matters. The OCC annual 2025 volume report reported 15.2 billion total options contracts in 2025, 24.4% above the 12.224 billion options contracts cleared in 2024, with average daily options volume rising to 60,586,309 in 2025. Those figures don't prove every trade is algorithmic. They show you're sending orders into a fast, crowded market.
Automation Architectures Compared
| Architecture | How the trade is triggered | Who places the order | Main risk |
|---|---|---|---|
| Alerts only | An alert notifies you when a condition is met | You, manually | Slow reaction after the signal |
| Webhook bridge | An alert posts a message to a broker bridge | The bridge, automatically | Duplicate or late orders with no review step |
| Bot or direct API code | Your program evaluates conditions and calls the broker | Your code, automatically | Bugs in your code and missing safeguards |
With alerts only, TradingView notifies you and you place the order by hand. You keep a review step, so you can spot a wide spread or wrong expiry. The cost is human delay and missed trades when you're unavailable.
A webhook bridge removes that delay. The alert posts a structured message, often JSON, to a bridge that sends the order. You gain speed, but you add a failure point. The bridge can retry a delivery, misread a payload, or act before you've seen anything.
A bot or direct API setup removes the bridge. Your program watches conditions and calls the broker itself. That gives you the most control, but every bug, missing safeguard, and unhandled rejection now lives in your own code.
Choose the lowest level of automation that still meets your timing needs, and name the failure point you're accepting before you choose.
Don't start with a bot because it feels advanced. Start with alerts if a short delay won't break the strategy. Move to a webhook only when delay is the proven problem, and keep logs that show what happened.
How a Webhook Turns a Signal into an Order
A webhook looks instant from the outside. Inside, it's a chain of handoffs, and any weak handoff can change the trade.
The diagram below shows the basic path from signal to live order.
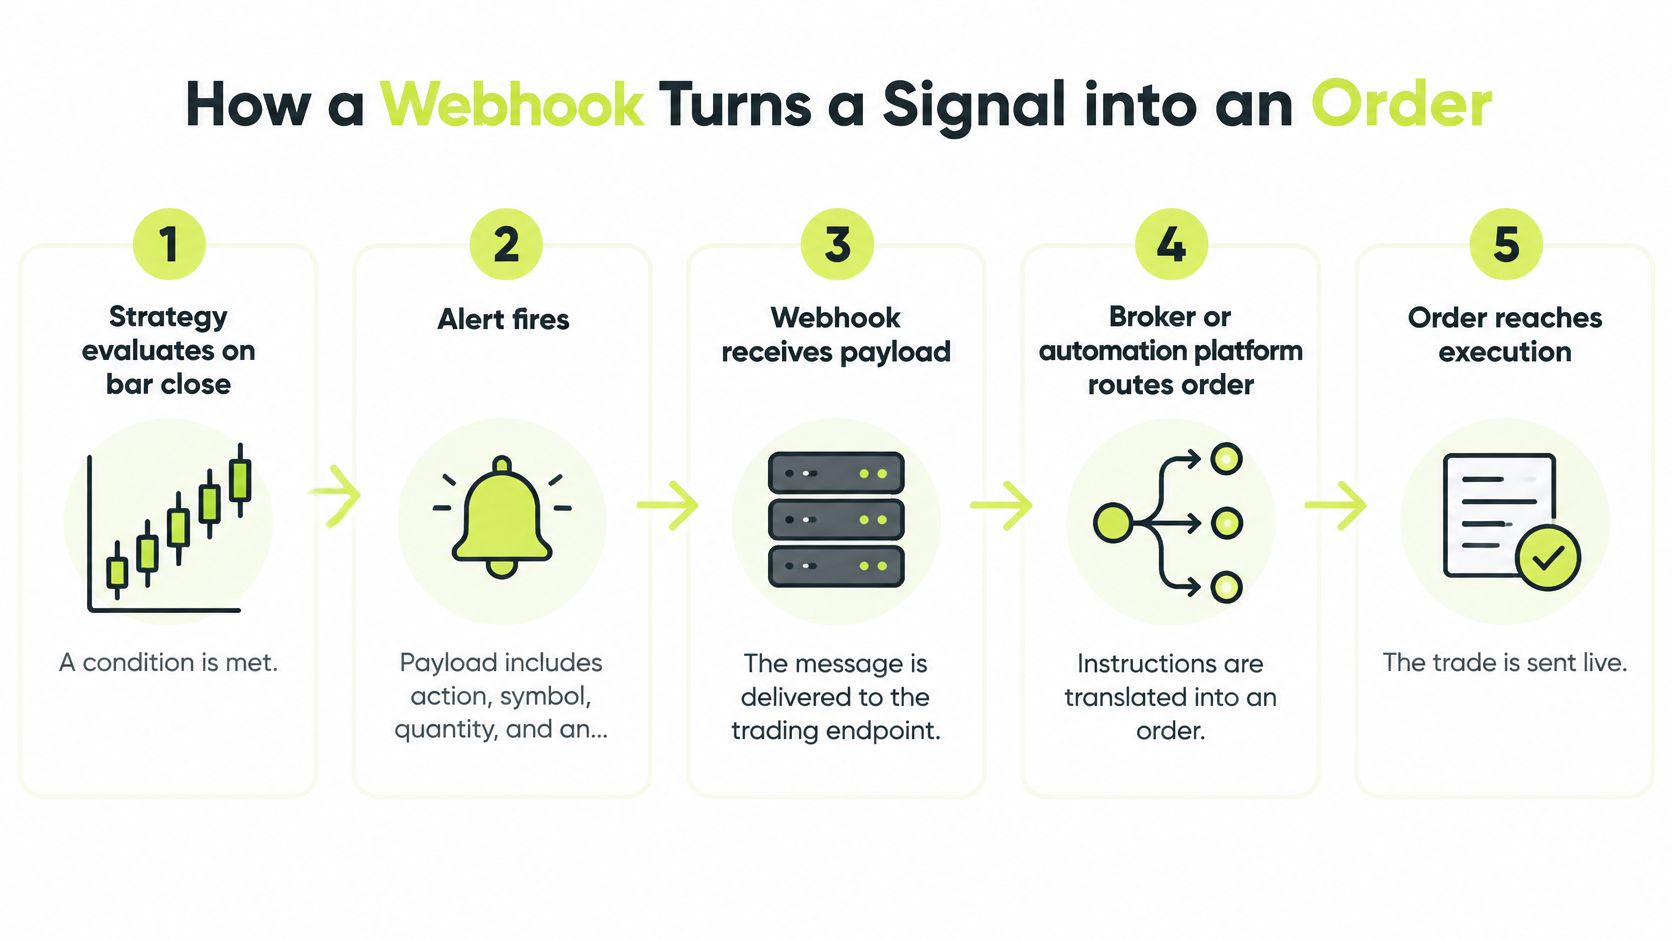
The Seven Handoffs
- Strategy decision: Your strategy evaluates on bar close and decides a condition is met. Evaluating on closed bars matters because a live bar can repaint, creating signals that never appear in the backtest.
- Alert payload: The alert fires with action, symbol, quantity, contract details, and an event ID. An incomplete option symbol is a common slip. Without expiry, strike, and call or put, there's no precise contract to trade.
- Delivery: TradingView sends the payload to the webhook URL over HTTPS. Retries can happen if delivery isn't confirmed, which is useful for reliability and dangerous for duplication.
- Validation: The bridge checks the payload and rejects anything malformed. It should confirm quantity, action, and a complete contract identifier before it considers an order.
- Duplicate check: The bridge compares the event ID with records it has already seen. This idempotency check means the same event can be received twice but acted on only once.
- Order submission: The bridge sends the order to the broker and records the request time. That timestamp lets you measure delay between signal time and submission time.
- Broker response: The broker acknowledges, rejects, rests, or fills the order. Each status should be logged, including partial fills and rejection reasons.
Say a signal for a call contract is stamped 10:02. Delivery fails briefly, a retry arrives at 10:04, and the bridge receives the same payload again. Without the event ID check, you could get two orders from one idea.
With the check, the second delivery is recorded as a duplicate and skipped. You still need to decide whether the delayed first order was too stale to send, but at least duplication hasn't doubled the position.
Checkpoint: Every step should leave a timestamp you can read back, from signal creation through broker acknowledgement and fill.
If you can't reconstruct the path after the fact, you can't prove the order was timely. You also can't tell whether a loss came from the strategy, the delivery path, or the broker response.
Multi-leg Orders and Leg Risk
Many options strategies aren't one trade. They're a package of contracts that only makes sense together.
Say your signal calls for a bull call spread. It buys the 100 call and sells the 105 call with the same expiry. Your intended risk is the net debit, and your maximum gain is capped by the short leg.
If the automation sends two separate orders, the first leg can fill and the second can be rejected or left unfilled in thin liquidity. You're then holding a naked long call. That position has different cost, risk, and exit rules from the spread you planned. This is leg risk.
Three Controls for Packages
- Use one combo order: Send the spread as a single package where the platform supports it, so the legs trade together.
- Set one net debit limit: Price the package as a whole instead of sending two separate market orders with no combined limit.
- Cap single-leg exposure time: Define how long a lone filled leg may remain open before an exit order fires.
Assignment adds another recordkeeping problem. Short legs on American-style equity options can be assigned before expiry. Your automation's position record must then match the shares or contracts in the broker account, not only the orders it originally sent.
That matters for any structure with a short leg, including combinations related to a buy call and sell put strategy. If assignment changes the account and your system still expects the old spread, the next exit signal can target a position that no longer exists in that form.
After each multi-leg order, check the log deliberately. Confirm all legs filled, confirm the unwind executed, or mark the package as an exception for manual review. Don't let a partial package sit unlabelled while the strategy assumes the full spread is on.
Failure Modes That Backtests Never Show
A strategy can backtest cleanly and lose money in its first live week without the signal logic being wrong. The pipeline behaved differently from the test.
The illustration below captures that gap between ideal test results and live execution.
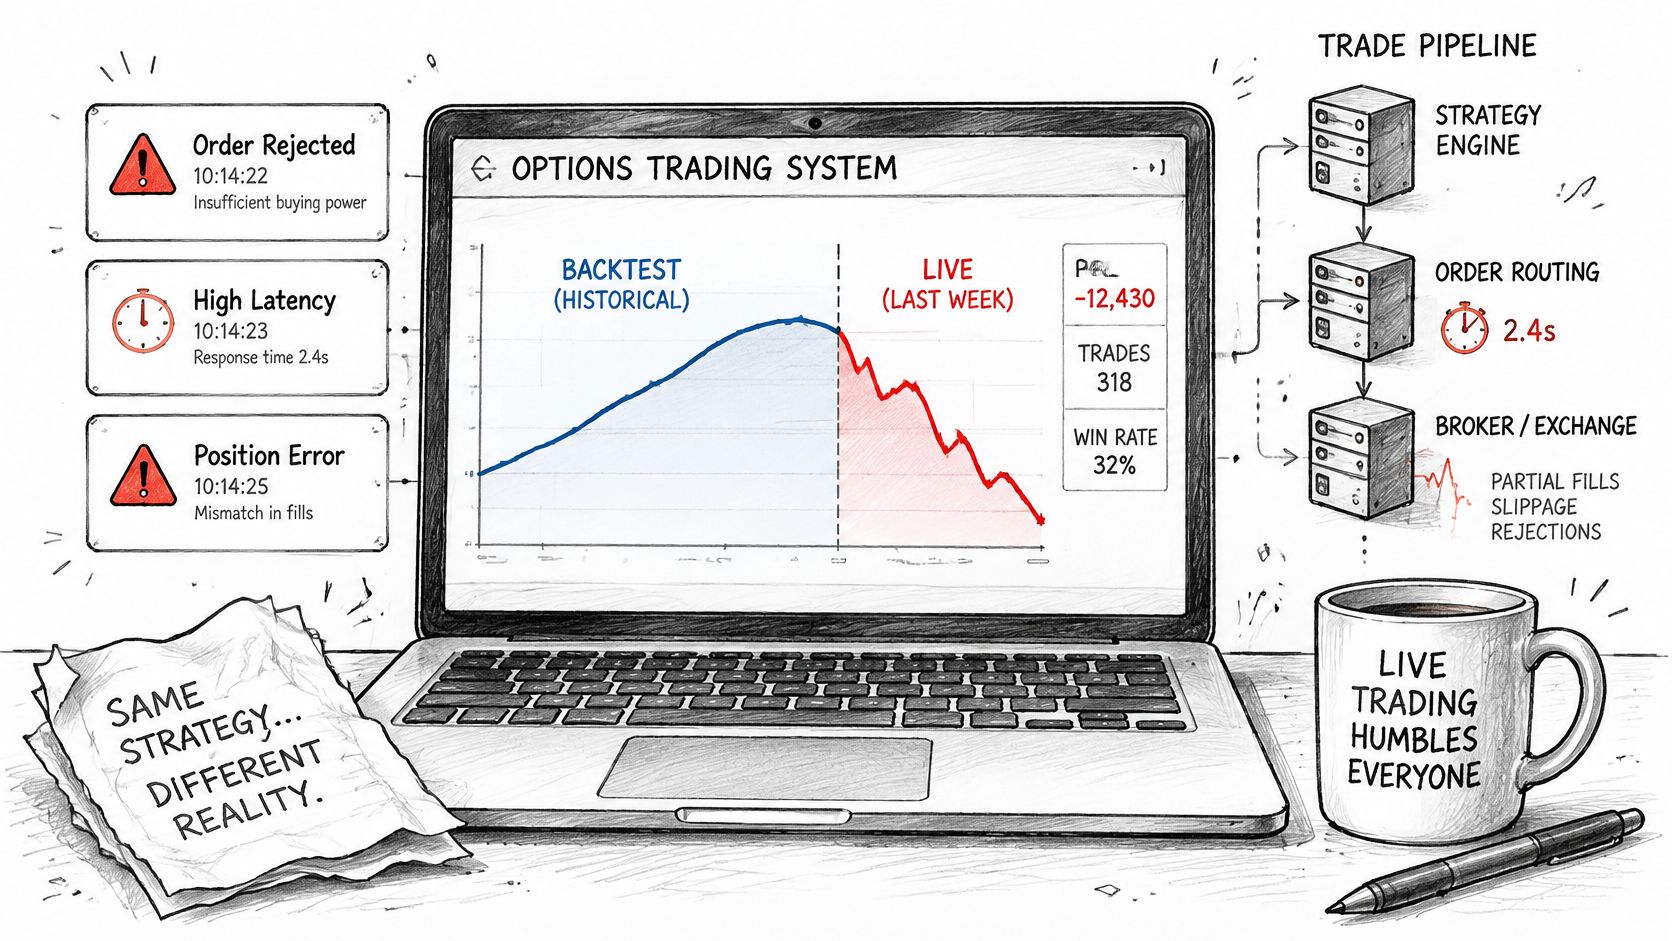
You must watch your automations because alerts can arrive late, twice, or not at all, markets move, and brokers reject orders. A few seconds of webhook delay can be normal. A signal that's minutes old on a fast contract may no longer match the price or setup that created it.
Short expirations raise the stakes. A Cboe review of Q3 2026 options volume reported that 0DTE options averaged 24.2 million contracts per day in Q3 2026, approximately 36% of total options volume. On contracts expiring that day, a delayed order isn't a minor inconvenience. It can be a different trade.
Failure Modes and What the Logs Show
| Failure mode | Typical trigger | What the logs show |
|---|---|---|
| Late alert | Delivery delay or queued retry | Signal time far earlier than order time |
| Duplicate alert | Webhook retry or repeated bar | Same event ID appears twice, or two orders from one signal |
| Stale alert | Signal arrives after the setup has moved | Fill price far from the signal price |
| Wide-spread fill | Market order in a thin strike | Fill price well above or below the midpoint |
| Partial fill | Shallow liquidity at the strike | Filled quantity below requested quantity |
| Broker rejection | Insufficient buying power or invalid contract | Order rejected with a reason code |
Read late and stale as different problems. Late describes delivery timing. Stale describes economic relevance. An alert can arrive quickly after a retry stamp and still be stale if the underlying has already moved through your entry zone.
A wide-spread fill often looks like bad luck until you compare fill price with midpoint. If you sent a market order into a thin strike, the log may show instant execution and a poor price. Speed worked. Price protection didn't exist.
Partial fills need an explicit rule. Do you keep the filled quantity, cancel the remainder, or exit what filled? Decide before live trading, because the automation shouldn't improvise and you shouldn't have to guess from a broker screen.
The video below gives you another way to think through what changes when a tested idea meets live orders.
Practical rule: Each failure should produce a log line that names it, so you can count how often it happens instead of relying on memory.
Counts change decisions. One rejection may be a buying power issue. Repeated stale alerts point to timing. Repeated wide-spread fills point to contract selection or order type.
Risk Controls to Build In Before Going Live
Controls aren't decoration around a strategy. They're the part that keeps a correct pipeline from placing an order you no longer want.
The checklist below highlights several starting controls.
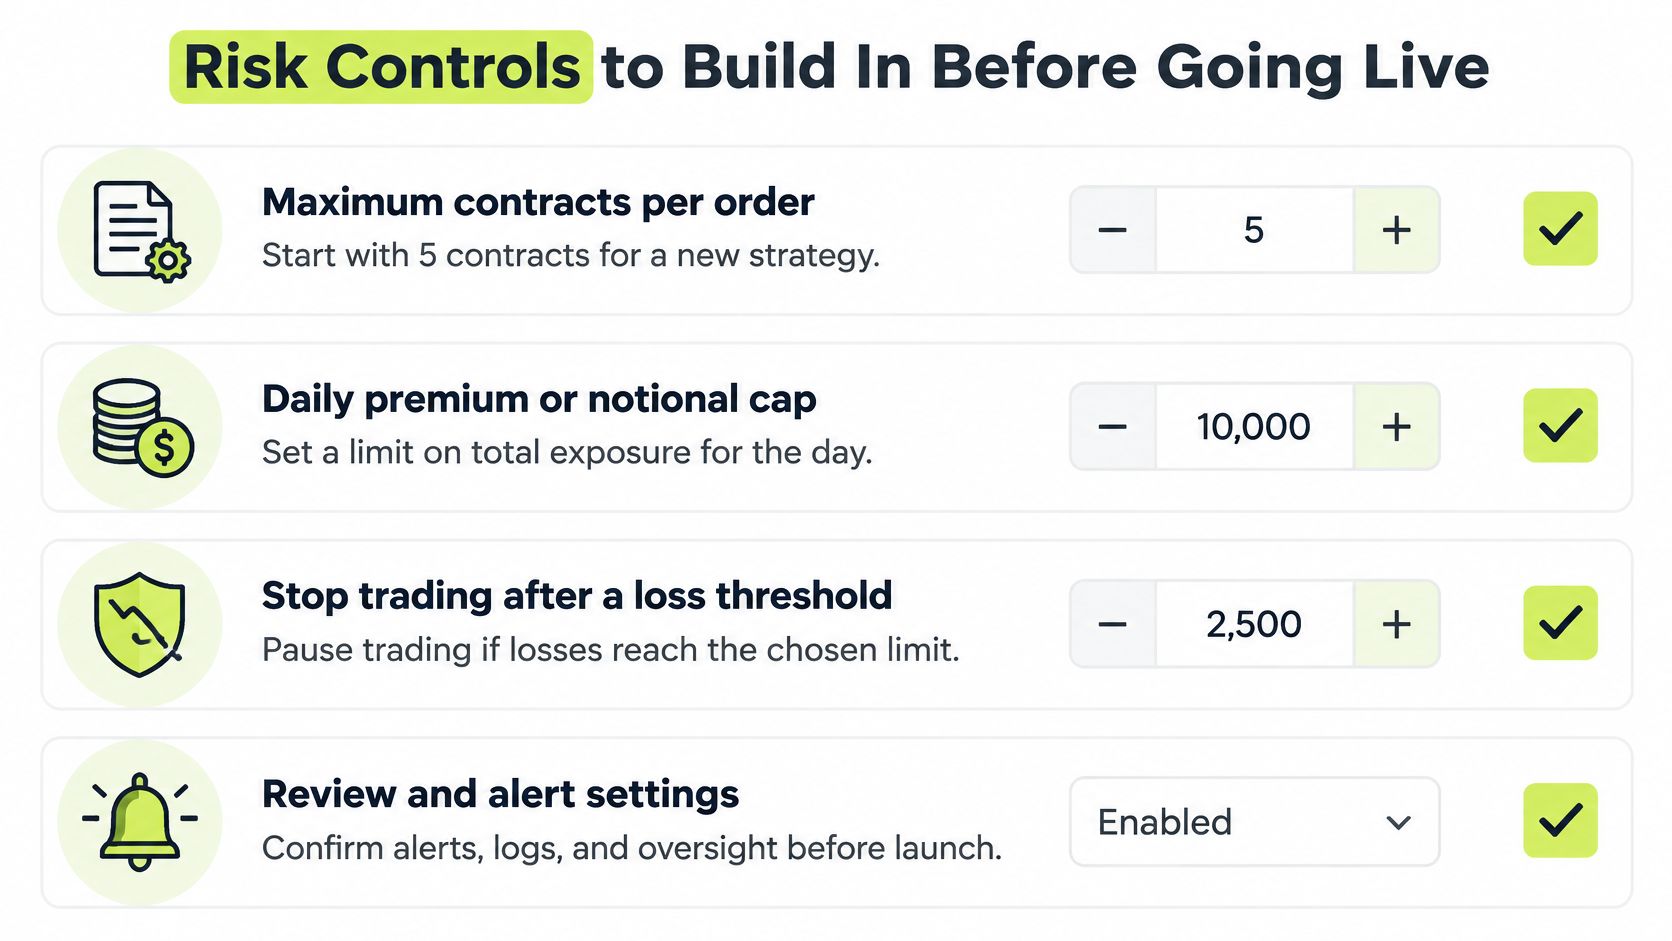
Starting Checklist
- Maximum contracts per order: For example, start a new strategy at 5 contracts. It prevents a quantity error from becoming a large position, at the cost of capping size until you raise it.
- Daily premium or notional cap: Set total daily exposure below the loss you can tolerate. It stops repeated entries, but it can block a valid later signal.
- Spread ceiling: For example, reject entries when the bid-ask spread exceeds 10% of midpoint, or use a midpoint limit order with a timeout. You'll miss some thin trades, which is often the point.
- Staleness window: Discard alerts older than about 30 seconds as a starting point. This prevents old setups from trading at new prices, while occasionally dropping a usable signal.
- Duplicate guard: Reject any event ID already seen. The cost is almost zero when event IDs are built correctly.
- Expiry and strike check: Confirm the contract exists on the live chain before submission. A rejected order is better than a guessed contract.
- Global pause: Block new entries while keeping exit orders available. Without that distinction, stopping the system could trap open risk.
- Daily reconciliation: Compare broker positions with the automation's record every day. It takes effort, but it catches partial fills, assignments, and missed exits.
- Connection loss stop: Halt new orders when the feed or broker connection drops, so the system doesn't trade on stale state.
These values are starting points, not universal settings. Size them to your account, contract liquidity, and holding period. A liquid weekly contract and an illiquid far dated strike shouldn't share the same spread ceiling.
Test each control by forcing its failure in test mode. Send a duplicate event, use an invalid strike, exceed the contract cap, and simulate a stale timestamp. A control you've never watched trigger is only an assumption.
Backtesting Options Strategies Without Fooling Yourself
A backtest that assumes ideal fills isn't a forecast. It's an optimistic sketch.
For example, say a contract has a 1.00 midpoint and a 0.10 spread. If you model a buy at midpoint instead of the ask, you're giving yourself 0.05 per side. That small gift can erase the entire edge of a frequent strategy.
The image below contrasts those optimistic assumptions with the corrections live traders need.
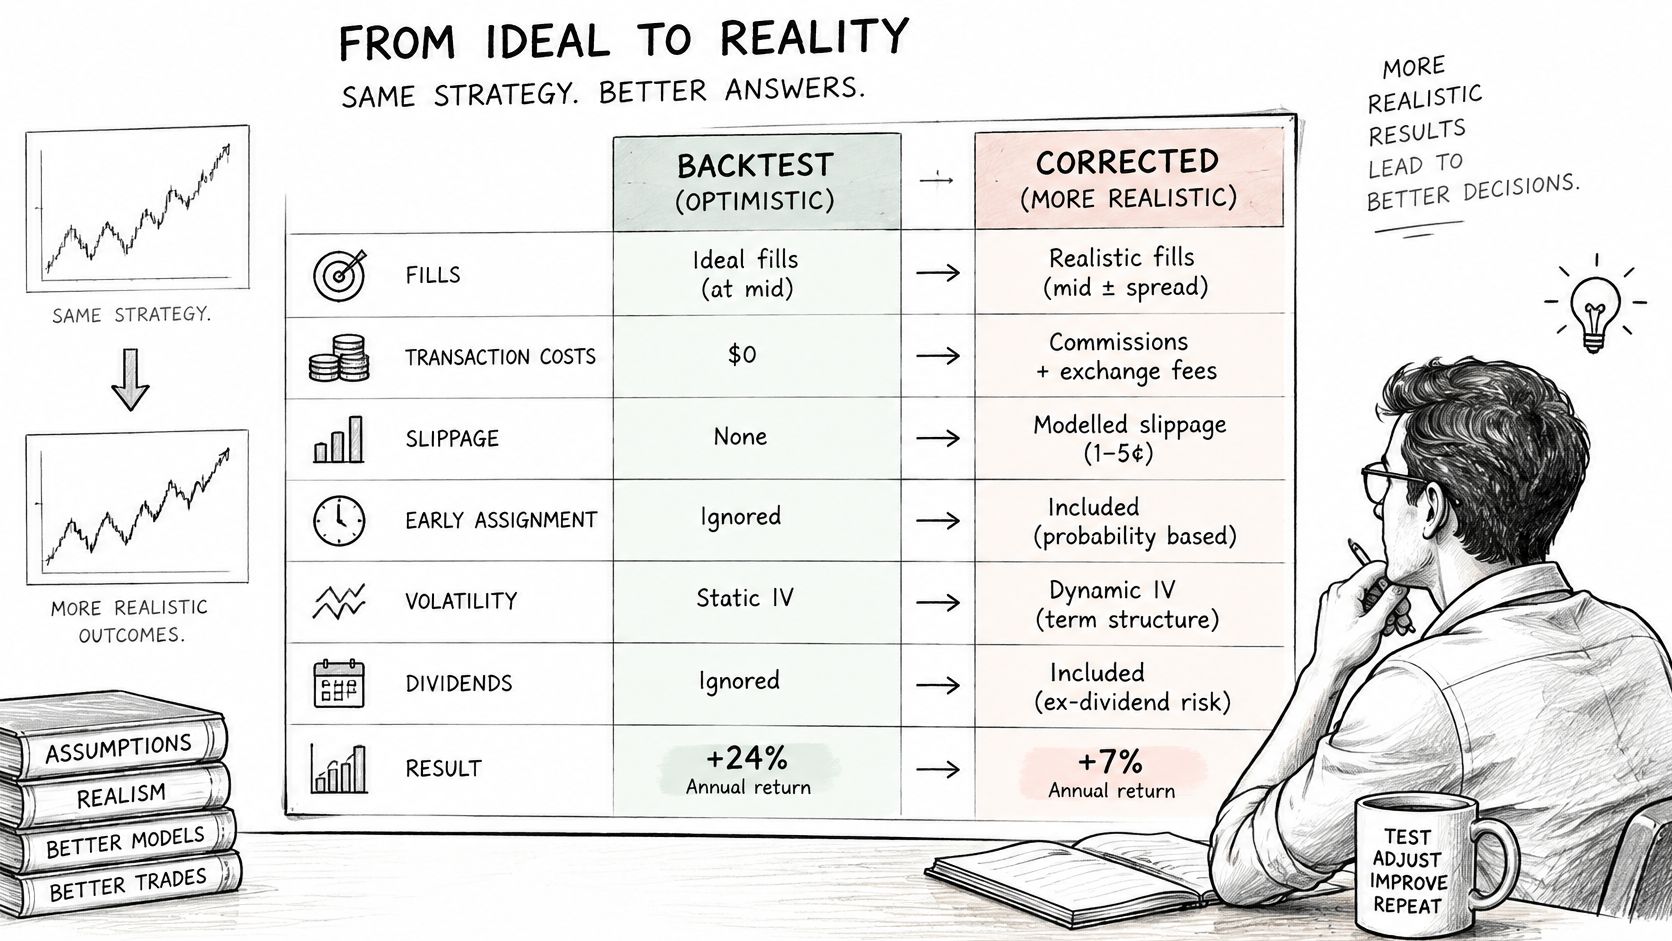
Backtest Assumptions and Corrections
| Assumption | Correction |
|---|---|
| Midpoint fills | Buy at the ask and sell at the bid |
| Commission per trade | Charge commission per contract for every leg |
| No slippage on thin strikes | Add slippage on top of the spread for low-liquidity strikes |
| Expiry ignored | Model expiry handling and early assignment on American-style equity options |
| Price-only model | Model implied volatility changes alongside price |
| Look-ahead bias | Fill the signal on the next bar's open, not the close it used |
| Perfect quotes | Treat strikes with missing quotes as unfillable |
| No latency or rejection | Add webhook delay and broker rejection rates measured from your signal log |
Commissions deserve special attention with multi-contract and multi-leg trades. A charge that looks trivial per trade can repeat for every contract and every leg. Entries and exits both count.
A price only model also misses implied volatility changes. An option can lose value after an earnings announcement even when the underlying moves your way, because the volatility priced into the contract falls. Your test should make that outcome possible.
Good guidance on how to backtest a trading strategy helps with structure, but options need these extra corrections. Then stress the result. Run a walk-forward or out-of-sample period, repeat with wider spreads and higher costs, and record both outcomes.
A strategy that's profitable only at midpoint fills is fragile, and learning that in testing is a useful finding, not a failed test.
Don't tune parameters until the stressed version looks good again. That usually teaches the strategy to fit old noise. Either improve contract selection, reduce trade frequency, or accept that the edge is too small for real execution costs.
Evaluating Platforms Against Five Criteria
Don't judge a platform by how quickly it can place the first order. Judge it by what it shows you when an order is late, skipped, duplicated, or rejected.
Platform Evaluation Criteria
| Criterion | What to check | Red flag |
|---|---|---|
| Scope | Options chains, expiries and multi-leg orders are supported | Equities or ETFs only, with no options support |
| Order handling | Limit and market order types, with spread controls | Market orders only, with no price guard |
| Failure visibility | Per-event logs, delivery receipts and reason codes | No record of skipped or rejected alerts |
| Safeguards | Duplicate detection, global pause and test mode | No test mode or no pause control |
| Account security | Broker credentials stay with the broker | Requests for broker passwords or reusable tokens |
Apply the scope check first. Read the documentation and confirm options chains, expiries, and multi-leg orders are supported, not just equities or ETFs. To make that concrete, Pineflows places market orders only, for US equities and ETFs, so it wouldn't pass an options scope check. Strong logs can't rescue a tool that can't trade the instrument.
For order handling, list the order types your strategy needs. If you need limit orders or a spread ceiling and the tool offers market orders only, that's not a minor feature gap. It's a mismatch between strategy risk and execution method.
For failure visibility, request a sample event log before you commit. It should record each alert received, each alert skipped with a reason code, each order submitted, and each broker rejection. Broader criteria for trade execution software can help, but your sample log test is specific to your pipeline.
Check safeguards by name. You need duplicate detection, a global pause that blocks new entries while leaving exits working, and a test mode that logs without sending orders. Run each one during evaluation if the tool allows it.
For account security, confirm broker credentials stay with the broker. A tool shouldn't ask for your broker password or a reusable token in a form or chat. If the credential flow is unclear, stop there.
A tool that can't show what happened to an alert isn't ready for live options orders.
Confirm Scope and Test Before Going Live
Use this sequence this week, in order.
- Confirm scope: Verify the platform supports options and the order types your strategy needs.
- Set controls: Add the staleness window, spread ceiling, daily cap, and contract limit.
- Run test mode: Keep it running for a full trading week and review the log for every signal. Pineflows starts in test mode where alerts are accepted and logged but never sent to the broker until the user switches to live mode, which is the pattern you should look for.
- Compare signal and chart: Check each logged signal at the same timestamp and record delays or mismatches.
- Force failures: Test a duplicate event ID and a dropped feed, then confirm each control stops the problem.
- Start tiny: Enable live trading with one contract and the smallest daily cap.
- Review week one: Count late, duplicate, stale, and rejected events.
- Raise limits last: Increase size only after logged behavior matches expectations.
You should review the alert log in test mode before switching to live trading, not after the first surprising fill. Automation doesn't reduce risk on its own. In fast markets, it can execute a flawed signal more consistently and more quickly.
Pick one strategy, set its controls, and run it in test mode for a full trading week before the first live order.
If your strategy trades US equities or ETFs rather than options, Pineflows can turn TradingView alerts into Robinhood market orders with test mode, pause controls, duplicate checks, and a readable event log. Start in test mode, verify each alert against your chart, and switch to live only when the logged behavior matches your strategy.